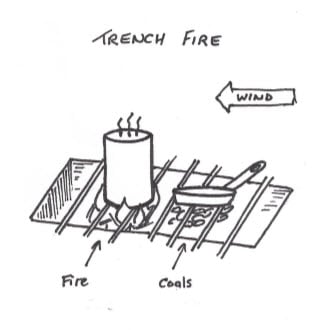
The trench fire is ideal for a small group at the same camp site for a number of nights to cook on, such as a long weekend family or scout patrol camp. This fire style is accommodating to windy areas as it keeps the fire tucked below ground level and the dirt removed from the trench can also be used as an additional windbreak. The fire however does require firm soil that can be easily dug and hold its shape, thus rocky and sandy grounds are not suitable.
A trench fire is good for cooking multi pot meals including boiling, grilling, frying and braising.
How to Build a Trench Fire
1/ Assess the location. As a hole needs to be dug ensure that you are allowed to do that at the location you are using. Check the ground, if it is too rocky it will be difficult to dig the hole, if it is too sandy the trench won’t be able to hold its shape and will fail. As always take into account the surroundings for fire hazards, wind direction and similar. (read more on fire location)
2/ Mark out the trench. The narrow end of the trench should be the leading edge towards the prevailing wind during the main meal cooking time (wind direction can shift throughout the day), this will help assure a proper draft. If you don’t have or wish to use a rack or green sticks, then the trench must be wide enough for your pots and pans to sit stably while cooking. If you are using a rack or green sticks the easy option is to go the width of the spade you are using to dig the trench.
3/ Dig the trench. Remove the top layer of vegetation carefully especially if there is grass or similar, this is normally done to just below the roots; about 5cm (2 inches). This can be replaced when you are finished with the site. Typically, a trench fire is not a box shaped trench like for a coffin, although there is nothing wrong if you choose to do it this way. A trench fire is on a slope with the shallow end up wind, leading down to the deep end. The shallow end is about 10cm (4 inches) deep with the deep end being about 30 cm (1 foot) deep.
4/ Light the fire. The fire is positioned in the middle of the trench and set to burn, when it is well established the fire can be split with the good coals going to the shallow end for grilling and similar with the fresh fire running at the deeper end producing flames for boiling and fresh coals that can be shuffled to the shallow end as required.
5/ Maintaining the fire. The fresh wood is fed into the deep end of the trench where there is more space and a large gap between fire and pots. As this burns down the coals are continually shifted to the shallow end if you are planning to cook there. As this is in the ground there is a slightly limited air supply compared to a fire on the ground so try not to compound this by adding too much wood which could starve the fire of oxygen. Try to always leave a small gap between the center of the fire and the far edge of the trench. Some people recommend the exact opposite of this, feed at shallow end; cook at deep end; do what works for you.
6/ Extinguishing the fire. The fire can be left to burn out when cooking is completed or the ashes and wood can be spread out across the base of the trench then gently put out with water as per standard practice. When cold the dirt can be returned to the hole followed by the carefully positioned grass layer. There may be a slight bulge to the ground due to the loosening of the soil but this will settle over time.
Thanks so much for the education