The Dakota Fire Hole gets its name from the Native American tribe of the Dakota, who populated the area that is now North Dakota, South Dakota, Wisconsin and Minnesota. It is generally regarded that they used this style of fire to combat the local windy conditions and avoid the potential of starting grass fires.
There are many other reasons this technique has remained popular to this day, and particularly so with survivalists. The airflow through the pit creates a very efficient burning of the fuel. This heat is then channeled directly to the cooking, area creating a hot cooking area whilst using relatively less wood than other fire options. The design also creates an easy to manage cooking area.
From a survivalist point of view, the reduced wood usage is very important, along with the fire being hidden below the ground (which is an advantage if trying to remain undetected). The clean burning process reduces smoke, also making it easier to remain undetected. The smoke that is created can be further camouflaged if the Dakota Fire Hole is located near trees or bushes that would further disperse the smoke.
From a practical point of view, however, it is time consuming to build and requires specific geological conditions to make it possible. This makes it practical only in times when you will be staying in the same location for extended periods of time.
How to Build a Dakota Fire Hole
1/ Assess the location. As holes needs to be dug, ensure that you are allowed to do so at the location you are using. Check the ground: if it is too rocky it will be difficult to dig the hole; if it is too sandy the trench won’t be able to hold its shape and will fail. Some locations may also be prone to the hole filling with water. As always, take into account the surroundings for fire hazards, wind direction and similar.
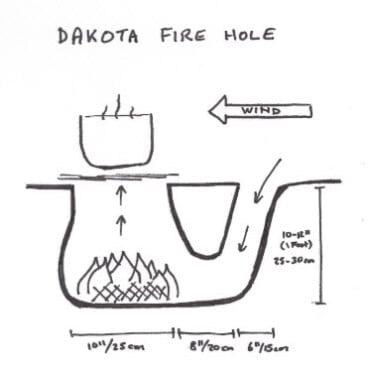
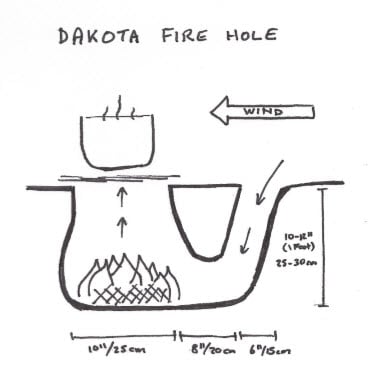
2/ Mark out the holes. The smaller hole, about 6 inches/15cm, should be dug towards the prevailing winds during the main meal cooking time (wind direction can shift throughout the day). This will help assure a proper draft. The larger hole, about 10 inches/25cm, should be dug on the downwind side of the first hole, leaving a gap of about 8 inches/20cm between them.
(Note: All the hole sizes are ‘about.’ These can be adjusted based on your conditions, including the tool being used to dig the hole, the size and volume of wood available, the size of the cooking pot, and the stability of the earth, just to name a few. When changing them, try to maintain the basic ratios.)
3/ Dig the holes. Remove the top layer of vegetation carefully from where the two holes are to be dug, especially if there is grass or similar (this is normally done to just below the roots, about 2 inches/5cm). This can be replaced when you are finished with the site. Dig the two holes first. Once these are completed, create the tunnel between the two. This should be about 6 inches/15cm in diameter.
4/ Light the fire. The fire is positioned at the base of the larger hole and can be laid as per your preferred method (such as the tepee or box). As this fire is primarily designed for boiling, you can start cooking on it almost immediately. Once burning, a cooking rack can be created with steel mesh or green sticks to rest your pot on. If you place the pot into the hole or cover the whole hole, it will starve the fire of the oxygen flow.
5/ Maintaining the fire. To add more wood you simply pass the wood into the burning area. Although a little more work, this is best done via the larger hole, meaning you need to remove the cooking pot. It is worth noting that a correctly set fire in this design, for a simple one pot meal, should not require additional wood to be added.
6/ Extinguishing the fire. This design allows the fire can be extinguished fairly quickly and safely. It can be suffocated of oxygen by blocking both the holes, buried with the removed soil, left to burn out in due course (while not being left), or extinguished with water.